Comment

Cilantro-Lime Chickpea and Avocado Salad

Hey, welcome. Consider following MSV on Twitter and subscribing to the RSS feed, or sign up for email updates right over here.

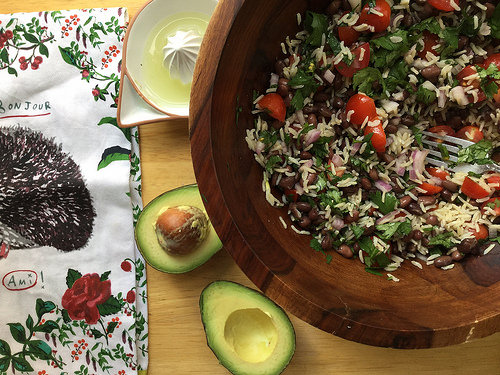
If you're short on time, this protein salad—featuring a mix of hearty chickpeas and creamy avocado—is your pal. An immersion blender (or small food processor) will get you a dressing seasoned with lime and fragrant fresh cilantro in no time. Bonus: it's thickened and made creamy by way of the combination of oil and pumpkin seeds.

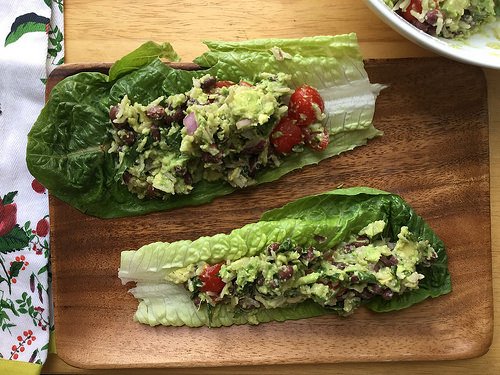
Once you've whipped up the dressing, there's nothing to do but mash canned chickpeas and stir those together with diced avocado. Top your toast or lettuce leaves and dig in with whatever lovely bit of produce you have in the kitchen as garnish. Hey, you're fed! And thereby ready to speed off to whatever's next on the schedule.

Cilantro-Lime Chickpea and Avocado Salad

Print the recipe

serves 4 [see Note]

2 15-oz cans chickpeas

2 ripe avocados, halved and pitted

1/4 cup loosely packed fresh cilantro

1/4 cup unsalted pepitas (hulled pumpkin seeds)

1/4 cup canola or other neutral vegetable oil (olive oil will not work here)

1 very small clove garlic

2 TBSP lime juice

2 TBSP water

1/2 tsp fine sea or kosher salt

For garnish: slices of cucumber, tomato, or radish; snipped chives or scallions; or whatever fresh produce you like.

Drain and rinse chickpeas. Set aside in a sieve to let drain thoroughly. Slice avocado halves, still in the skin, into dice, and set aside.

Add remaining ingredients, except garnish, to a wide-mouth jar and process with an immersion blender until smooth (or, if you have a small food processor, that'll work, too).

Add chickpeas to a mixing bowl and mash roughly with a fork. Add avocado dice to the mixing bowl, using a spoon to scoop out the flesh. Add dressing and toss until combined.

Serve at once with your fresh garnish on toast or in lettuce leaves.

[Note: avocado does not keep well once exposed to air, so if you do not need all four servings at once, you can make a half-recipe by making all of the dressing at once, and reserving half in a small container in the refrigerator for several days. Prepare the other half of chickpeas and avocado at your leisure, and your dressing is already waiting for you.]

Comment

Comment

Tortilla-Wrapped Poblanos Stuffed with Corn and Almond Pâté

Hey, welcome. Consider following MSV on Twitter and subscribing to the RSS feed, or sign up for email updates right over here.

AKA the lazy vegan's chiles rellenos. Like any stuffed dish, these poblanos—filled with a delightfully rich and comforting mix of creamy almond pâté and sweet corn kernels—take a bit of effort to prep, but they're totally do-able, even on a weeknight. Also, best entertaining dish ever—serve with a little beans and rice and Palomas, with a mezcal digestif, and done. The peppers take a bit of time to cook in the oven, so if you really want to revel in your dinner, you have plenty of time to make a batch of fresh tortillas while that goes on. If you just can't find the energy, store-bought guys will do the trick on any given Tuesday.

I will note that there's a little messing with stuff in a hot skillet in order to get that tortilla glued around the roasted pepper, so if you're a brand-new cook, or tend to be extra timid with such things, you may want to wait until you have a day off and/or a kitchen buddy on hand. But it's well worth the effort, and way easier than frying battered peppers, so I encourage you not to let that deter you from trying these out.

To give credit where it's due, I've long had the notion of stuffed poblano tamales in my head, but I've been out of the tamal groove (tragedy!), and so they remained only a tasty dream. Then at La Cocina de Frida in a Oaxaca market, something was brought to the table.

See that little guy all wrapped up in the lower right corner? Genius. And so simple. I didn't taste that dish, since the poblano there was stuffed with cow's milk cheese, but I thought, why not? Why not, indeed?

When you shop for peppers, be sure to grab ones that will fit comfortably in your tortillas. I generally believe thick tortillas to be the absolute end, but in this case, a more standard thickness (or, if you're making your own, even a little thinner than store-bought) is the perfect amount of carbs to go along with your little green dreamboat. So for maximum deliciousness, you'll want a single tortilla to wrap around the pepper and seal in front (unlike that picture up top where there's an extra tortilla glued in at the bottom because that pepper was too large—whoops).

Look at that guy. So good. First one to try it on an outdoor grill instead of a skillet wins summer.

Tortilla-Wrapped Poblanos Stuffed with Corn and Almond Pâté

Print the recipe

serves 4

4 small-medium poblano peppers, washed and dried

100 grams blanched almond meal

3 TBSP lime juice

1/3 cup unsweetened soy milk

2 TBSP canola (or other neutral vegetable) oil

1 scallion, trimmed and thinly sliced

1/2 tsp salt

1/2 tsp dried Mexican oregano

2/3 cup frozen (or fresh) sweet corn kernels

olive oil, for drizzling

4 corn tortillas, freshly made or store-bought

1 tsp all-purpose flour

1 tsp water

Begin by preparing the peppers. Slice the pepper lengthwise down the center, stopping before you get to the tip. Make two more cuts at the top, cross-wise, to give yourself some room to work, but leave the back half of the pepper top attached. Use a paring knife to cut away the seeds and veins, as best you can. Repeat with remaining peppers and set aside.

Heat oven to 400. Have an 8x8" square (or similarly-sized) nonstick dish ready.

Add almond meal, lime juice, milk, oil, scallion, salt, and oregano to a food processor and process until smooth. Remove blade and stir in corn. Spoon mixture into peppers. Do not overstuff, since the almond mixture will puff a bit during cooking.

Transfer filled peppers to baking dish and drizzle lightly and evenly with olive oil. Bake 45 minutes, until filling is cooked (it will be creamy, but not wet) and peppers are roasted and well browned in spots. Set aside.

When ready to serve, heat a nonstick skillet over medium heat. While it heats, stir together flour and water in a small bowl to form a paste.

Add a tortilla to the skillet to warm it until pliable, just about half a minute. Carefully place a pepper atop it, cut-side up. Use tongs to pull one side of the tortilla up over the pepper and hold it in place with your hand. Use a finger to spread a dollop of flour paste on the top of the tortilla edge, then pull the other side of the tortilla up (using the tongs again) and press gently to glue it in place. With still holding the tortilla edges to keep them together, carefully turn the whole thing over so that the folded side is now at the bottom of the skillet and press very gently to ensure both ends are secured by the weight of the pepper. (This sounds far more complicated than it is—do it once and you'll have it down). The heat will take care of the rest and seal your tortilla once the paste is cooked. Let cook a couple of minutes, until golden, then carefully flip and brown the other side. Carefully transfer to a serving dish with a wide spatula. Repeat with remaining peppers and serve.

Comment

Comment

Party Animals No. 58: Rosette Veg Tart for a Potluck with the Neighbors

Hey, welcome. Consider following MSV on Twitter and subscribing to the RSS feed, or sign up for email updates right over here.

Happy Friday, everyone. I have an imprecise Party Animals post today, featuring this deep-summer veg tart, which I made mid-spring. I can't begin to know whom to credit for the veggie-rosette thing, but once I saw pictures, I knew exactly what to take to my neighbors' potluck (where people would be eating my cooking for the very first time). It was a lovely evening, and I'm pretty pleased with how this guy came out. Especially since I didn't follow anyone's recipe, and just winged it. (No, I have no idea why. I blame a busy schedule?) It's rich, but also decidedly vegetal, thanks to sheer quantity of veg needed to make the rosette. And of course, texture abounds: tender, thin squash and eggplant, flaky pastry, and rich almond pâté all play extremely well together.

To make something similar at home, grab a half-dozen yellow and green squashes, a globe eggplant, and your very finest vegetable peeler. Wash them all well and set them aside. Now prepare a batch of Lemon and Herbes de Provence Almond Pâté, and get it in the oven. While it bakes, if you have time and desire, whip up a pie crust. If you're in a hurry, set out some vegan puff pastry to thaw, as I did.

While that bakes and the other thaws, get to spendin' some quality time with the veg. Slice, slice, slice, until you have a massive stack of thin planks. Here's where my instructions get murky. To season the veg, I tossed it in a simple lemon vinaigrette, but my tongs tore up some of the more delicate squash planks (where it gets seedy). So, I dunno. Maybe very gently mix with your hands. Maybe mix the vinaigrette separately and drizzle it very slowly over the assembled tart. Who could know? There might be a recipe out there that could help, but I wouldn't know. I'm too busy to do things like learn, apparently.

Stuff your thawed pastry sheet into a nonstick 9-inch springform pan, and stretch the high corners over to help the bits that fall short. Don't sweat it too hard. Spread the still-warm pâté over the pastry using the back of a spoon (wet it to prevent sticking). Wrap your veggies around each other until all you have left is broken planks, and you're too tired of all this endless wrapping to try to piece together the rest of the rosette. Save the broken bits for grilled veggie sandwiches. Fold in the rest of the puff pastry so you have kind of a galette-thingy with a crust of puff pastry filled with almond pâté, which will be bananas-tasty.

Season your tart with flaked sea salt and black pepper. Pop it in the oven until golden, let cool before removing the pan sides and wrapping in parchment. The next day, when you actually attend your potluck, pop the tart (still on the bottom of the springform pan) back into your oven on a warm setting while you make mashed potatoes to go along with your tart, and leave it in the oven until time to head next door. Accept all the compliments on how pretty your tart is (even though you technically messed it up) and be ready to explain what all that is, exactly. Drink your neighbors' wine, and have a nice time. The tart is best served warm.

Happy gathering.

Comment

Comment

Snack Oat Bars with Whole Lemon and Ginger

Hey, welcome. Consider following MSV on Twitter and subscribing to the RSS feed, or sign up for email updates right over here.

Today, the whole-lemon train pulls into the snack station. It takes a minute to slice up the lemon and grate the ginger for these guys, but otherwise, they require absolutely no sweat. Your reward is a more complex lemon snack that includes tart pulp plus floral peel accented by bitter pith—all hugged in a chewy, mildly sweet blend of whole wheat and oats.

These bars are way more substantial than your average supermarket cereal bar, so they'll keep you satisfied for a good minute as a snack. And if you happen to have some vegan vanilla ice cream in the freezer, feel free to put a scoop atop a square for a fuss-free weeknight dessert.

Snack Oat Bars with Whole Lemon and Ginger

Print the recipe

serves 9 generously

1 very large lemon (or 2 small), scrubbed

knob of fresh ginger, 1 1/2 inches long by 1 inch wide, peeled

1/3 cup natural cane sugar (evaporated cane juice)

2 cups rolled oats

1 cup whole wheat flour

1/2 cup turbinado

1/4 tsp freshly grated nutmeg

1/4 tsp salt

1/2 cup unsweetened applesauce

1/2 cup unsweetened plain soy milk

Trim one end off the lemon so you can see the pulp (discard pithy end). Use a sharp knife to carefully slice the lemon into paper-thin slices. It's far more important to get thin slices than it is to get whole slices, so concentrate on the paper-thin bit, and don't worry if you only get half-slices (or even less sometimes). Transfer to a small mixing bowl. Use a Microplane zester to grate ginger into mixing bowl. Add natural cane sugar to mixing bowl and gently toss until thoroughly mixed—this may take a minute, and don't worry if a lemon slice (or two) breaks. Set aside.

Heat oven to 350 with a rack placed in the center.

In a mixing bowl, whisk together oats, flour, nutmeg, and salt. Separately, whisk together applesauce and milk. Add wet ingredients to dry and stir until just combined.

Add a generous half of batter to a nonstick (or greased) 8"x8" pan. Press dough firmly and evenly into pan. Spread lemons evenly over dough. Pour any sugar and lemon juice in the bottom of the bowl over the lemon layer. Sprinkle remaining dough evenly in blobs atop lemons and press gently into a top layer (it should mostly cover the lemons, but you may have a spot or two of the lemon layer showing through).

Bake 37-40 minutes, until golden. Let cool completely in the pan on a wire rack before cutting.

Comment

Comment

Hitting the Books No. 7: Gena Hamshaw's Power Plates (ftr. Whipped Banana-Coconut Cream)

Hey, welcome. Consider following MSV on Twitter and subscribing to the RSS feed, or sign up for email updates right over here.

I'm pretty jazzed about this little Hitting the Books post. I'll be highlighting two seriously lovely (and easy!) recipes from Gena Hamshaw's Power Plates, which I've been having a great time digging into lately. Anyone who reads The Full Helping won't be surprised that this latest book of Gena's is totally gorgeous:

Also unsurprising, but still valuable is the conceit of this cookbook, which offers "nutritionally balanced" dishes. Frequently, that means the recipes showcase a grain, a protein, a fat source, plus a buncha veggies. I love that kind of thoughtful framing—basically, Gena thought about it so now I don't have to. It makes reaching for this book a no-brainer when I need to plan meals during busier times.

And busier times are exactly what I've been having lately. So instead of digging deep into the bowl section—with all its alluring chopped veggies, savory proteins, and variety of sauces and dressings—I've sampled some of the quicker items from Power Plates. Starting with this to-die-for Guacamole Rice Salad with Black Beans. (It's actually a quinoa salad in the book, but I find quinoa aggressively joyless, so I swapped in brown rice. I can't wait to try this with couscous, too, but I've been adoring the rice.)

Gena advertises this salad as basically a batch of guacamole with mix-ins, so sign me up. And boy howdy, does she deliver. This seems like a dish you would hardly need precise instruction for, but I promise you want to use Gena's recipe. The balance of everything is bang-on, and this is my new favorite meal. Stuff it in romaine leaves and eat it like a taco, and invite me over when you do.

The recipe starts with preparing all the avocado and then adds everything else, but I don't need the whole recipe at one sitting. To make it work for my leftover-reliant weekdays, I assemble the salad first, which keeps well in the fridge for a few days, then add freshly mashed avocado to the amount I want just before serving. Works like a charm.

I was so eager to dive into this recipe that I bought grocery store cherry tomatoes in April. I regret nothing, but they were predictably sad, so my advice is to substitute chopped Persian cucumbers, diced jicama, or a mix of both, if you're making this out of season (which I continue to do because you could not possibly stop me).

I'm equally enthusiastic about Gena's Whole Grain Waffles. The first thing that struck me about Power Plates is how generous the breakfast section is, with plenty of savory options. I may have mentioned fifty or so times that I prefer savory breakfasts to sweet. But I make an exception for waffles. These are made with spelt, which I had never used before, and they are super-tasty. If you adore nutty, more complex whole-grain baked goods, then there's nothing more I need to say here. These guys are totally great, and I'll be making these repeatedly whenever I'm craving a waffle with sweeter toppings.

Speaking of toppings, I have something special for you. It's a dead-simple whipped banana-coconut cream, and it adds a dreamy, fluffy tropical note to any baked good, fruit salad, fresh berry, or spoon you care to stuff in your pie hole. I finished off this particular plate with some trail mix I had handy, but cacao nibs are also a nice, crunchy addition. Or you can enjoy the cream atop the waffles without anything extra. I recommend it like I recommend Power Plates.

Whipped Banana-Coconut Cream

Print the recipe

yields 1 generous cup

1 can full-fat coconut cream chilled at least 24 hours, such as Thai Kitchen brand

1 just-ripe banana

1 TBSP powdered sugar

1 tsp lemon juice

1 tsp vanilla extract

Spoon the solid fat from the chilled can of coconut cream (reserve liquid for another use). You should have one rounded cup of chunks (not firmly packed).

Puree all ingredients in a food processor until smooth and fluffy. Leftovers may be kept for several days in an airtight container.

__________________________________________________________

About Hitting the Books: You know that shelf in your house with all the great cookbooks you don't get to nearly as often as you'd like? Yeah, there's one of those over here, too. The Hitting the Books series allows for occasional opportunities to dig into that shelf and highlight some handy cookbooks.

Comment

Comment

On the Town No. 4: Greetings from Oaxaca

Heya! I don’t have a recipe for you this week because I’ve been in Oaxaca soaking up all the textiles, mezcal, chocolate de agua, paint, plants, and politics I can manage in only a handful of days. Folks who have been reading for a while know that Mexican food traditions are my absolute favorite to draw from when putting together my own meals, so this first trip to the nation is a long time coming for me.

I won’t do a long Oaxaca post (I mean, unless y’all really ask for it), but please know I’m sending this digital postcard(*) with much love and masa. Back to normal scheduling this week, all going well.

(*so to speak—I’m actually just back home now, sigh)

Comment

1 Comment

Dead Simple Zucchini Toast with Avocado, Lemon Zest & Coconut Bacon

Hey, welcome. Consider following MSV on Twitter and subscribing to the RSS feed, or sign up for email updates right over here.

I'm on a minor mission to work more fresh veggies into my diet, and it seems particularly satisfying to be able to squeeze some in during the first meal of the day. Enter this wholesome toast topped with shredded zucchini. Bonus: this works with sourdough, whole wheat, pumpernickel, whatever—maybe even an everything bagel? So, hey, variety is built right in.

It's worth noting that since this is such a simple dish, the more flavorful your zucchini, the better this toast will be, so keep this one in mind when summer's finest is overflowing at the market. But you won't rely entirely on your zucchini for flavor, of course. You'll enrich your shredded veg with a little mashed avocado, a sprinkle of salt and black pepper, lemon (both zest and juice), and to finish with extra satiety and salt, a generous dose of coconut bacon. Good morning, right?

And note that you can prepare the coconut bacon in advance to make this recipe extra morning-friendly.

Dead Simple Zucchini Toast with Avocado, Lemon Zest & Coconut Bacon

Print the recipe

serves 2

1 small-medium zucchini, washed and ends trimmed

4 slices bread of choice

1 ripe avocado, halved and pitted

1 lemon

1/4 tsp fine sea or kosher salt

freshly cracked black pepper, to taste

1 recipe Stovetop Coconut Bacon, recipe follows

Grate zucchini until you have 2/3 cup, loosely packed. Add zucchini to a mixing bowl and set aside.

Toast or grill bread. Meanwhile, roughly score the avocado flesh, still in the skin, into dice. Scoop flesh into mixing bowl. Rather than cutting the lemon in half, cut off just one third and set the larger portion aside. Measure out 1 tsp of juice from smaller portion and add to mixing bowl. Add salt to mixing bowl and use a fork to mash the avocado, mixing in the zucchini and seasonings as you go.

Divide zucchini mixture evenly among toast. Crack pepper generously over top, to taste. Zest larger portion of lemon generously over top, to taste (the lemon can be juiced after zesting, so reserve for another purpose). Divide coconut bacon evenly over toasts and serve at once.

Stovetop Coconut Bacon

yields 1/4 cup, adapted from Colleen Patrick-Goudreau

1 tsp reduced-sodium tamari

1 tsp liquid smoke

1/4 tsp maple syrup, grade B preferred

1/4 cup shredded unsweetened coconut

Heat a nonstick skillet over medium heat. In the skillet, combine tamari, liquid smoke, and maple syrup. The second it begins to boil, sprinkle coconut over and stir until thoroughly mixed. Continue cooking for a few minutes—stirring every 30 seconds—until coconut absorbs all liquid, the skillet becomes dry, and coconut just begins to crisp in spots. Your nose is your best guide. When it smells deeply toasted and just shy of burning, quickly remove from heat and immediately transfer to a plate, spread out in a single layer. Coconut will continue to crisp as it cools. Store leftovers in an airtight container with a clean absorbent cloth (to keep it from going soggy).

1 Comment

Comment

Ten-Minute Breakfast Tacos

Hey, welcome. Consider following MSV on Twitter and subscribing to the RSS feed, or sign up for email updates right over here.

Okay, full disclosure: the first time you make these breakfast tacos, they might take 12 or 13 minutes. But that's because you're reading the recipe and getting familiar with what to grab from the fridge and pantry. Once you've made them once or twice, it's smooth sailing. You grab your tortillas while the skillet heats, grab the tofu while the tortillas warm, then grab the spinach and slice the avocado while the tofu cooks, and before you know it, a fresh hot breakfast is helping you greet the day in style.

With that out of the way, these guys are seriously easy to love. Fluffy crumbled tofu and a little fresh spinach wilted in a mix of sesame oil and tamari make for a light but flavorful combination. Top it all with ripe avocado slices doused with hot sauce, and that lovely mess is fully ready to be hugged in a warm corn tortilla. As a bonus, it takes only a few minutes longer to feed four as it does one (because the tofu will take longer to brown in a more crowded skillet), so this recipe scales decently.

Perfect and fast enough for breakfast, you may find yourself adding a side salad and a Bloody Mary to make these guys into brunch, or a side salad and cold Pilsner for dinner in a snap. Don't say I didn't warn you.

Ten-Minute Breakfast Tacos

Print the recipe

serves 1

2 six-inch soft corn tortillas

1/3 block firm or extra firm tofu

1/8-1/4 tsp (to taste) fine sea or kosher salt

freshly cracked black pepper

2 tsp nutritional yeast

1/2 ripe avocado, pitted

1 tsp sesame oil

generous handful fresh baby spinach

1 tsp reduced-sodium tamari

hot sauce, to serve [see note]

Heat a large nonstick skillet over medium-high heat. Heat oven on warm setting.

Place tortillas in skillet. Heat for a minute on each side, or until tortillas are pliable and beginning to puff in spots. Transfer tortillas to oven rack to keep warm.

Crumble tofu into hot skillet. Sprinkle salt, pepper, and nutritional yeast over top. Let cook, undisturbed, two minutes. Meanwhile, slice avocado half while still in its skin.

Reduce heat to medium-low, toss tofu, and let cook one minute, undisturbed. Toss again and let cook one last minute. Remove tortillas from oven, transfer to serving plate, toss tofu again and spread evenly over tortillas.

Return skillet to heat. Add sesame oil, then spinach. Pour tamari over spinach and cook until wilted down, stirring constantly. Divide between tacos.

Scoop avocado slices from skin with a spoon and divide between tacos. Top with hot sauce and serve at once.

[Note: these benefit from an acidic finish, so if you do not like hot sauce, squeeze a lime wedge over tacos before serving.]

Comment

Comment

Blackberry and Rose Water White Wine-Lillet Blanc Sangria

Hey, welcome. Consider following MSV on Twitter and subscribing to the RSS feed, or sign up for email updates right over here.

Your next spring afternoon pitcher has arrived.

This white sangria—sweetened with a syrup flavored with blackberries and rose water—is an easy-going affair. Choose a dry white, maybe something grassy (such as a New Zealand Sauvignon Blanc). You'll add Lillet Blanc (a French fortified wine) to add depth of flavor. I'm currently in love with Lillet-spiked white sangrias. They have more depth than a wine-only recipe, but aren't as stiff as one with liqueur added. Add frozen raspberries and a couple of ice cubes, and get ready to sip away in the sun.

Blackberry and Rose Water White-Lillet Blanc Sangria

Print the recipe

serves 6

750 ml dry white wine, chilled

1 cup Lillet Blanc, chilled

1/4 cup Blackberry-Rose Syrup, recipe follows

1 sweet apple, diced

frozen blackberries (not thawed), to serve

rosemary sprigs, to garnish

Combine wines, syrup, and diced apple in a serving pitcher. Stir to combine. To serve, add two ice cubes and a handful of frozen blackberries to a wine glass. Pour in sangria and garnish with a sprig of rosemary.

Blackberry-Rose Syrup

1/2 cup sugar

1/2 cup water

1/2 cup frozen (or fresh) blackberries

1/8 tsp rose water

Dissolve sugar into water, stirring occasionally, in a small pot over high heat. Bring to a boil and immediately add berries. Bring back to a boil, cover, and reduce heat to low. Cook at a low simmer for 30 minutes. Strain, reserving stewed berries for another purpose. Stir in rose water and let cool before using. Store leftover syrup in the refrigerator.

Comment

Comment

Creamy Orzo and Chickpea Bake (from the Pantry)

Hey, welcome. Consider following MSV on Twitter and subscribing to the RSS feed, or sign up for email updates right over here.

This dead-simple baked pasta is going to solve all your early-spring meals. It starts out as a welcome hot dish for gray, blustery days. But it also eats fine at room temperature. Leftovers served as chilled pasta salad make an instant lunch on sunny afternoons. Whatever spring throws your way, this dish has you covered. And it comes together in a snap: you chop the pepper and quickly blend the sauce while the orzo cooks on the stove top. Then the whole thing goes in the oven, and done.

This pasta and bean number is homey and comforting, thanks to cooking the orzo in veggie broth with a sprig of rosemary. Then you'll bathe the pasta and chickpeas in a creamy, high-protein sauce of silken tofu blended with herbs, a little white wine, and a good dose of spring onions. Green peas and diced roasted red peppers add welcome color and gorgeous little pops of sweetness. Plus, with frozen peas and jarred red peppers, you can keep the ingredients for this guy on hand to toss together on any given evening.

And if you're in the mood for something a little richer, feel free to top the whole thing with some panko crumbs tossed in oil and a little salt.

Creamy Orzo and Chickpea Bake (from the Pantry)

Print the recipe

serves 2-4

2 cups water

2 no-salt-added vegetable bouillon cubes

1 fresh rosemary sprig

1 cup orzo

1 15-oz can chickpeas

1 large jarred roasted red pepper (or freshly roasted, if preferred)

6 oz silken tofu (half an aseptic pack)

1/4 cup dry white wine

4 scallions

2 TBSP canola oil (or other neutral oil, but olive oil is not recommended [see Note])

1/2 tsp dried thyme

1/2 tsp dried oregano

1/2 tsp fine sea or kosher salt

freshly cracked black pepper, to taste

1/2 cup frozen peas

Add water and bouillon cubes to a medium pot over high heat. Dissolve cubes and bring to a boil. Add rosemary sprig and orzo. Boil 9 minutes (or according to package directions), stirring frequently to prevent sticking. Do not drain. Discard rosemary sprig.

While the pasta cooks, heat oven to 375. Drain and rinse chickpeas in a sieve and set aside to let drain thoroughly. Chop pepper into small dice.

Next, prepare the sauce. Add tofu, wine, white and firm pale green portions of scallions (reserve tops for garnish or for another purpose), oil, thyme, oregano, salt, and black pepper to a food processor. Blend until smooth.

Add chickpeas, diced pepper, and frozen peas to the orzo pot. Stir to combine. Add sauce and mix thoroughly. Transfer contents to a  1 1/2-quart baking dish (shallow, app 8"x12") and bake 20 minutes. Let cool five minutes before serving. Garnish with sliced scallion tops, if desired.

[Note: food processors and immersion blenders can turn olive oil bitter. I found that to be true when processing this sauce with olive oil and had good results using canola oil instead.]

Comment

Comment

Pineapple, Black Bean and Poblano Salsa Fresca

Hey, welcome. Consider following MSV on Twitter and subscribing to the RSS feed, or sign up for email updates right over here.

All this unseasonably warm weather in Knoxville has awoken cravings for water-rich fruits. But it's still February, so let's raid the citrus and frozen aisles of the grocer to scratch that itch.

This guy is really a cross between a salad and salsa fresca, since it gets a bona fide dose of dressing. But no matter. It still eats great on a corn chip. So, to your totally satisfying base of sweet-tart pineapple chunks, earthy black beans, gently piquant poblano, and fragrant green onions, you'll add a dressing of cilantro and mint, which pairs wonderfully with fruit. To really drive that home, you'll use a base of orange juice (also some lime), then give the whole thing a little body with olive oil and a little pine nuts. It's simple, fresh, criminally easy to make, and entirely lovable. Get munching.

Pineapple, Black Bean and Poblano Salsa Fresca

Print the recipe

serves 4-6

For the salsa:

1 15-oz can black beans

2 cups frozen pineapple chunks, thawed (or use roughly 1-inch fresh chunks)

1 medium poblano pepper, trimmed, seeded, and de-veined

2 scallions, trimmed

zest of 1/4 orange (app 1/2 tsp)

fine sea or kosher salt and freshly cracked black pepper

For the dressing:

1/4 cup tightly packed cilantro

1/4 cup loosely packed mint leaves

2 TBSP pignoli (pine nuts)

3 TBSP orange juice

2 TBSP olive oil

1 TBSP lime juice

1/4 tsp fine sea or kosher salt

Drain and rinse beans in a sieve. Set aside to let drain thoroughly.

Meanwhile, chop pineapple chunks into roughly 1/2-inch chunks and transfer to a serving bowl. Chop poblano into small 1/4-inch dice and add to bowl. Finely slice tops and bottoms of scallions and add to bowl. Grate orange zest (before juicing the orange), add to mixing bowl, and set aside.

Make dressing by puréeing all ingredients until well blended, about 20 seconds. Add dressing, to taste, to mixing bowl and stir to combine thoroughly. (You may have a few tablespoons of dressing left over—if so, it works well as a green salad dressing, too.) Season to taste with freshly cracked black pepper and, gently, with salt (if serving with salted chips, you may not want to salt further at all).

Salsa can be served at once, but benefits from an hour's rest in the fridge for the dressing flavors to come together and season the fruit, veggies, and beans.

Comment

Comment

Orange, Dill, and Fennel Chickpea Salad with Essential Fluffy Tahini Spread

Hey, welcome. Consider following MSV on Twitter and subscribing to the RSS feed, or sign up for email updates right over here.

There may be nothing handier than having a batch of chickpea salad hanging out in the fridge. Plus, making your own convenience foods gets you instant meals that are made to suit your tastes. Like this simple and flavorful little chickpea salad that will fill you up whether on a plate of munchies with crackers, tucked into a loaf of pita, or scooped atop big tender lettuce leaves. Mash up your chickpeas, stir in some dill, orange zest, and a little fennel seed, and you're set.

Well, almost. First, you whip up this simple tahini spread. Which is currently the favorite sandwich spread in the MSV kitchen. It's lemony and satisfying, and hangs onto a sandwich without running all over the place like thinner tahini sauces. And it's all thanks to pureeing in just a little bit of silken tofu. Did I mention handy?

Orange, Dill, and Fennel Chickpea Salad with Essential Fluffy Tahini Spread

Print the recipe

serves 4-6

2 15-oz cans chickpeas

2 TBSP fresh dill

zest of half an orange (about 1 tsp)

generous pinch fennel seed

1/3 cup Essential Fluffy Tahini Spread, recipe follows

fine sea or kosher salt and freshly cracked black pepper, to taste

Drain and rinse chickpeas. Set aside in a sieve to let drain thoroughly while you prepare the other ingredients.

Transfer chickpeas to a mixing bowl and mash roughly with a potato masher. Stir in all other ingredients and add salt and pepper to taste.

Essential Fluffy Tahini Spread

yields about 1 cup

1/3 cup tahini

1/4 cup silken tofu (from an aseptic pack)

1/4 cup water

3 TBSP lemon juice

1 small clove garlic

1/2 tsp fine sea or kosher salt

Blend all ingredients until smooth. Spread can be used immediately, but will firm and fluff up a bit after chilling in the refrigerator.

Comment

8 Comments

Herman (1999-2018)

I lost a friend a couple weeks back, which is why I haven't been around.

                                 portrait of Herman by Matthew Everett

I have been dreading writing this post, but also really want to have it up. So, let's power through, shall we? Then we can get to the photos of this adorable cat and be done crying for the day, maybe.

My husband, Matthew, brought Herman to live with him seven years before we got together. After making the move to Knoxville (from Alabama), Herman would move to two other cities with Matthew before settling back here. Early in our relationship, Matthew once demonstrated how readily Herman came to him when his name was called. I probably single-handedly eroded that neat trick—though surely not their long-lasting bond—with the torrent of ever-evolving names I called Herman. It started simply enough when Matthew, a fan of the television series Arrested Development, began jokingly calling him "Hermano" from time to time. I ran with it. Hermano became Hermanito, Hermansquito (goofily pronounced hermanskweeto), then devolved into just Squito, Squito-Bido (yes, skweeto-beeto), and finally landed pretty hard on plain Bido, which most commonly extended into Bido-san. You know, to show respect. I guess.

That definitely wasn't it, though. He was also any number of terms of endearments: cutie pie, cutie pants, fuzzy pants—all sorts of pants, really, including his longest and silliest name Reyito Hermanito de los Pantalones. Also frequently "noodle"—my catch-all for (non-human) animals I want to address affectionately—including "noodle head" and, most perplexingly but also most frequently, "noodle butt."

He was also regularly called Little Buddy. Herman called my husband Big Buddy. (He called me Big Buddy's Girlfriend/BBGF for most of his life.) I made that cat talk so much. A ridiculous amount.

Bud and Herman are closely tied in my memories, because they were both already on the scene when I met my now-husband. As I wrote in Bud's memorial post, that dude was some kind of special. Everybody knew it, too. But almost no one knew Herman. He'd had a rough first year of life before he got to my husband, and he did not rise out of it an alpha cat. He was frightened of almost all strangers and took to a secure hiding place should one come through his front door. (He grew out of this a little bit in his last couple of years as an old man who had run clean out of fucks, which was pretty cool). Herman was a super-anxious little guy, concerned that he would not get what he needed in this world, and handled Bud's illness with what I will generously call a lack of grace. I always liked to think that Bud and I were a little kindred, taking in the big picture while living in the moment, but the truth is, I know there's a lot of Herman in me. There's a lot of Herman in all of us: just trying to make it through without being hurt, and acting out of fear more than we need to.

Herman wasn't only a little shit, though. He was also curious, playful, and way engaged with the world around him. Every box, paper bag, and open kitchen cupboard held a new surprise for him, and he explored them all. Given the chance, he liked to think he would've proven himself a stone killer (just ask the pigeons on the fire escape protected by window glass), but he channeled those skills mostly into drowning rubber bands in his giant water fountain, which he adored. Man, did he love that fountain. He was one enthusiastic jumper in his younger years.

He also trusted my husband and me entirely. He never hesitated to walk up, look me in the eye, and yell when he was hungry. His verbal communication left nothing to misinterpretation. I'm so glad he trusted us enough to boss us around. I'm happy to have waited on him hand and foot. We loved him so very much. We are much bereaved.

Herman spent much of his life, and every possible moment of the winter months, on my husband's lap.

My lap, on occasion, would do until Matthew's became available.

He tolerated and even encouraged an absurd amount of petting and nuzzling from me, though he would suffer no one to hold him, not even Matthew, for more than a few seconds.

On the rare occasions Matthew left town without me, I relished the extra snuggling I got from Bido.

He was appallingly handsome. He had a perfectly round little head and a dignified snout.

He begged for coconut milk when I baked, and I have a habit of getting flour in the floor when I bake. His face got in the way one day.

We're so lucky to have lived with him.

I miss you, Bido-san.

Thank you all for bearing with me. I'll try my best to get back in the swing of things here on MSV soon.

8 Comments

Comment

Blueberry, Lemon and Thyme Granola

Hey, welcome. Consider following MSV on Twitter and subscribing to the RSS feed, or sign up for email updates right over here.

Good granola is a real treat, and this easy stove-top version is so very nice. Start with plenty of oats, of course, and dress them up with lemon zest, fresh thyme, and a heap of gorgeous dried blueberries. The result is wonderfully fragrant and irresistible. Eaten for breakfast, it's a seriously lovely way to start your day. Try it on tofu mousse for instant morning meals—you won't be sorry.

Because dried blueberries are so expensive, using seeds (here, sunflower and pumpkin) instead of nuts (and canola oil instead of pricier fats) maintain satiety while keeping the cost down a little. But follow your bliss and customize your toss-ins to include whatever you love best. And of course, a little goes a long way.

Blueberry, Lemon and Thyme Granola

Print the recipe

yields one quart

1/2 cup hulled unsalted pumpkin seeds (pepitas)

1/2 cup hulled unsalted sunflower seeds

2 cups rolled oats

1/2 cup dried wild blueberries

1/2 cup dried unsweetened shredded coconut

zest of one lemon

1 tsp fresh thyme leaves

1 TBSP canola oil

2 TBSP brown rice syrup

1 tsp vanilla extract

generous pinch fine sea or kosher salt

Heat a large, dry, nonstick skillet over medium heat. Add pepitas and sunflower seeds. Dry toast, tossing every minute or two, until pepitas begin to lighten. Add oats, blueberries, coconut, lemon zest, and thyme leaves. Continue to toast, tossing every minute, until the oats are toasted.

Meanwhile, whisk together oil, syrup, and vanilla (measuring the oil before the syrup will help the sticky syrup slide out of your measuring spoon). When the granola mixture is toasted, pour wet ingredients over and stir to combine thoroughly. Let cook two to three more minutes, stirring frequently.

Transfer mixture to a parchment-lined baking sheet and spread out. Sprinkle salt evenly over the whole thing. When cool, break apart and store in an airtight container.

Comment

Comment

Balsamic Tempeh, Oranges and Haricots Verts

Hey, welcome. Consider following MSV on Twitter and subscribing to the RSS feed, or sign up for email updates right over here.

The sour and sweet of balsamic vinegar is a great match for nutty tempeh. And since it also pairs well with all manner of green veg, why not toss in some long, thin green beans to contrast those dense little chewy tempeh squares?

That's already a recipe for success, but where this dish really stands out is by throwing in fat, juicy orange segments to cook with the balsamic and a bit of bitter and savory toasted sesame oil. The juice from the orange scents the dish (further helping that tempeh out), but the fruit itself is knee-shakingly lovely—gorgeously flavorful orange wedges you can periodically pick up and eat with your paws for a rare finger-licking veggie experience. So good. (And probably not a first-date meal. You're also gonna want to floss after. Totally worth it.)

Seriously satisfying when served with a mixed-potato and cauliflower (s)mash seasoned with plenty of nutritional yeast.

Balsamic Tempeh, Oranges and Haricots Verts

Print the recipe

serves 2

1 TBSP olive oil

8 oz frozen green beans (preferably thin variety, may be labeled haricots verts)

8 oz tempeh, cut into 1/2-inch dice

1/4 tsp salt

freshly cracked black pepper

1 orange, unpeeled, cut into 8 wedges

2 TBSP balsamic vinegar

1 tsp toasted sesame oil

Heat olive oil in a large skillet over medium heat. Add green beans and cook, stirring frequently, until the frost is knocked off, about three minutes. Add tempeh, salt, and pepper, and let cook two minutes. Toss. Repeat, tossing every two minutes, until tempeh is golden brown and beans are seared in spots, about 12 minutes total. Transfer to a plate and set aside.

Return skillet to heat and add orange wedges and balsamic. Cook, tossing frequently, until orange flesh softens, about five minutes. Add sesame oil and toss to coat.

Return tempeh and beans to skillet. Cook another three minutes or so to let the orange scent the dish and ensure the tempeh and beans are heated through. Serve at once.

Comment

2 Comments

The Basics No. 6: Jumbo Savory Chickpea-Rice Pancake

Hey, welcome. Consider following MSV on Twitter and subscribing to the RSS feed, or sign up for email updates right over here.

Happy 2018, friends! If you're struggling with a return to routine, let me introduce you to one of the easiest, most reliable dinners out there: this huge, fluffy, savory pancake made from chickpea and white rice flours. It's tasty, filling, and ready in minutes. It's made entirely from things you keep on the pantry shelf and studded with frozen peas that keep for ages in the freezer.

Whatever project you have going on, all you need is a 10-minute break to make sure you're fed and nurtured. Let's get cooking.

Anyone who's ever had a dosa knows how pleasantly crispy white rice flour cooks up in a hot skillet. You'll get that great magic on the edges, but the bulk of this guy is soft from the combination of rice flour and chickpea flour, seasoned with nutritional yeast and—for bananas-convenient flavor—a little spoonful of vegetable broth powder (check your local co-op's bulk section). You can always toss in some garam masala or garnish with fresh herbs, but the basic recipe is good to go.

Like the jumbo buckwheat and blueberry pancake, this recipe halves perfectly. Make the whole thing for an express dinner, split it with a pal or make half if you're in the mood to pair it with a hearty salad or soup, or just make a half-recipe if all you need is a solid snack (or for a savory breakfast if you don't have a big appetite in the morning).

Finally, don't skip the sauce. You'll find this pancake just a touch dry, which is a feature, not a bug. It welcomes a generous amount of hot sauce, a mild pureed salsa, or whatever else you feel like drizzling on or dipping in without getting soggy.

Dead Simple Jumbo Savory Chickpea-Rice Pancake

Print the recipe

serves one generously, or two as a snack or meal component

1 tsp olive oil

1/4 cup chickpea flour

3 TBSP white rice flour

1 TBSP nutritional yeast

1/2 tsp vegetable broth powder [see Note]

1/4 tsp baking powder

1/2 cup water

small handful frozen (or fresh) peas

Heat oil in a large nonstick skillet over medium heat. Meanwhile, add chickpea flour, rice flour, nutritional yeast, broth powder, and baking powder to a bowl and whisk to combine.

When the skillet is hot, swirl the oil around the skillet to coat. Add water to dry ingredients, whisk to combine, and immediately add batter to skillet. Sprinkle the peas over the surface. Cook until the bottom is golden and the edges are visibly cooked at least 1/4-inch in (and up to 1/2-inch, being careful not to burn—this allows for easy flipping, even with the very large pancake), about 3-4 minutes. Flip with a wide plastic spatula and cook until cooked through and browned on the pea side, another 2-3 minutes.

Serve at once with hot sauce, salsa, or other sauce of choice.

[Note: salt content will vary depending on the brand purchased. Season to taste after cooking, if needed.]

2 Comments

Comment

Party Animals No. 57: A Table of Munchies for Xmas Eve (or Whenever You Need)

Hey, welcome. Consider following MSV on Twitter and subscribing to the RSS feed, or sign up for email updates right over here.

I host both Thanksgiving and Christmas Eve at my place for our tiny family. After the big November meal, my husband requested more of a cocktail-party setup for December. We still served ourselves buffet-style for ease. If you need a festive spread for NYE or any other time, may this generous little spread help you with inspiration.

Beverages:

  • Kir Royale
  • spiced Assam tea Toddy (substituting grade A dark/robust maple syrup for honey)
  • for non-alcoholic, spiced tea with hot soy milk and a little extra maple

The munchies menu:

  • fresh grapes
  • pear chips (pear slices pressed in sugar and baked at low temp for a couple hours)
  • rosemary mixed nuts
  • spiced oat cookies with espresso glaze
  • toasted french bread slices and whole-grain crackers
  • smoky almond pâté
  • veg cream cheese (Kite Hill recommended) with dill and capers
  • ginger fig jam (store bought)
  • freshly cracked black pepper
  • coconut bacon

Happy entertaining! Here's to the days getting longer and the table being full. Happy New Year's to you all, and thanks so much for hanging with me in this totally bananas year. Onward!

Comment

Comment

Chickpeas, Artichokes, and Capers in White Wine Tomato Sauce over Polenta

Hey, welcome. Consider following MSV on Twitter and subscribing to the RSS feed, or sign up for email updates right over here.

It's December, which means pantry-cooking season has officially begun. Enter this perfect weeknight bowl of creamy polenta topped with a mix of tomatoes, chickpeas, artichoke hearts, and capers all simmered with a little dried herbs and dry white wine.

The combination is a great one. Polenta provides heft (and starchy absorbing properties) so the tomato sauce doesn't have to be cooked to death, just long enough to let the wine, shallot, and herbs infuse. Capers add a salty punch that communicates comfort without adding weight. The artichoke is another great, light foil for the polenta while chickpeas offer protein for extra satiety. What's more, with canned goods and quick-cooking polenta, you have a killer dinner ready in just about half an hour. Plus leftovers.

Chickpeas, Artichokes, and Capers in White Wine Tomato Sauce over Polenta

Print the recipe

serves 4-6

For the topping:

2 TBSP olive oil

2 shallots, thinly sliced

1/2 tsp fine sea or kosher salt

1 28-oz can diced tomatoes

1 15-oz can artichoke hearts (or 6-8 frozen hearts, thawed), drained and chopped

1/2 cup dry white wine

1 TBSP turbinado

1 tsp dried basil

1/2 tsp dried oregano

1/2 tsp crushed red pepper flakes

2 15-oz cans chickpeas

2 TBSP drained capers

For the polenta (see Note):

1 cup quick-cooking polenta (or grits)

1/2 cup blanched almond meal

1 tsp fine sea or kosher salt

1 tsp freshly cracked black pepper

3 cups unsweetened soy milk

3 cups water

Heat oil in a large skillet over medium heat. Cook shallot and salt for a few minutes, stirring frequently, until shallot turns translucent. Add tomatoes (with liquid), chopped artichoke, wine, turbinado, basil, and oregano. Bring to a steady simmer, cover, reduce heat to medium-low (or lower, as needed) to maintain simmer, and let cook 15 minutes.

Meanwhile, drain and rinse chickpeas. Set aside in a sieve to let drain thoroughly. Measure dry polenta ingredients into a bowl and whisk together.

After the 15 minutes is up, add chickpeas and capers to tomato mixture. Stir, increase heat to medium, and let cook at a strong simmer, uncovered, stirring occasionally, until flavors have melded, 10-15 minutes.

While the tomato mixture finishes, combine soy milk and water in a pot over high heat. When it begins to steam, begin whisking while pouring the dry polenta mixture into the pot in a thin, steady stream, whisking all the while. When all is incorporated, be sure the mixture is bubbling, cover, and reduce heat to low. Cook five minutes, covered, carefully whisking the bubbling mixture well once each minute.

Divide polenta among shallow bowls and top with chickpea-tomato mixture. Serve at once.

Note: because this polenta is served soft, it's best to make only the amount you will need at this serving. The polenta recipe scales down perfectly, so feel free to make a quarter of the recipe to feed one (quite generously), or make the full recipe to feed up to six.

Comment

Comment

Dead Simple Black Bean Nachos with Chipotle Pumpkin Sauce

Hey, welcome. Consider following MSV on Twitter and subscribing to the RSS feed, or sign up for email updates right over here.

Food doesn't get much more fun than nachos, even non-traditional ones like these guys. And what better time for an autumn-flavored pick-me-up than now, when the days are about as short as they get (if you're in my part of the globe, anyway).

So, grab a handful of chips and douse them in a pumpkin sauce spiced up with chipotles en adobo for a dead-simple, totally flavorful dish. It all comes together in a snap thanks to the convenience of canned pumpkin, beans, and chiles.

You'll pop all that in the oven to get everything warmed and mingled, and meanwhile, you'll chop a few fresh elements to balance the salt and spice (namely, crisp red pepper, fresh cilantro, and creamy avocado). Then nothing left to do but pour yourself a cold one and get munching.

Dead Simple Black Bean Nachos with Chipotle Pumpkin Sauce

Print the recipe

serves 4-6

For the black bean and chipotle pumpkin sauce:

2 15-oz cans black beans

1 15-oz can pumpkin puree

1/2 cup water

1 no-salt-added vegetable bouillon cube

1 chipotle en adobo

2 TBSP nutritional yeast

1 TBSP canola or grapeseed oil

1 generous pinch fine sea or kosher salt

1 generous pinch Mexican oregano (optional)

To assemble:

tortilla chips

diced red bell pepper

chopped cilantro leaves

chopped avocado

flaked sea salt and freshly ground black pepper

Heat oven to 375 (if assembling nachos right after making sauce)—see Note.

Drain both cans of beans, but do not rinse. Add to a medium pot and set aside.

Add remaining sauce ingredients to a food processor and process until very smooth, 30-60 seconds.

Add pumpkin mixture to pot with beans and bring to a boil over medium heat. Reduce heat slightly to medium-medium low. Cook, stirring frequently, until heated through and thickened a bit, about five minutes.

To assemble, pile tortilla chips snugly in a low mound in a baking dish and pour sauce over top, leaving a small border of chips uncovered (the chips touching the sauce will absorb it and soften, but the chips below and to the side will leave some crunchy chips that can scoop up toppings). Bake 15 minutes.

Remove from oven, top generously with diced pepper, cilantro, and avocado. Sprinkle top of dish gently with flaked salt and then generously crack black pepper over top. Serve at once with forks.

Note: once the sauce is done, nachos can be assembled immediately in any desired quantity. Leftover sauce can be refrigerated for days and reheated as desired to make a batch.

Comment

Comment

Party Animals No. 56: Thanksgiving 2017

Just a quick pop-in to run over the all-vegan MSV Thanksgiving for the year.

Which was pretty much exactly the same as last year. The family has decided this menu is not broken and should therefore not be fixed. There was a little freedom to play with the welcome cocktail and dessert, though, so here we go.

Raspberry lambic and creme de cassis topped with brut cava and garnished with a rosemary sprig-skewered branded raspberry made for a fruity and lively drink to toast the day.

Dessert was a dead simple apple crisp (based on this recipe), served warm with (Coconut Bliss brand) vanilla ice cream and topped with those brandied cranberries.

Hope everyone who got a long weekend enjoyed it. As ever, thanks so much for being here.

Comment